• Beta Release: 100% Free Knowledge Base Software now live!
  • Products
    • Live Chat
    • Chat Pages
    • Knowledge Base
  • Services
    • Hire Chat Agents
    • Hire a Virtual Assistant
  • Customers
  • Partners
    • Become a Partner
    • Partner Directory
  • Resources
    • Help Center
    • Academy
    • Developers
    • Blog
  • Why Free?
Menu
  • Products
    • Live Chat
    • Chat Pages
    • Knowledge Base
  • Services
    • Hire Chat Agents
    • Hire a Virtual Assistant
  • Customers
  • Partners
    • Become a Partner
    • Partner Directory
  • Resources
    • Help Center
    • Academy
    • Developers
    • Blog
  • Why Free?
Log in
Sign Up Free

Video Links – Creating And Managing Aliases

You can have multiple aliases, so you can answer each chat with any name you like

Contents
  • Introduction
    30s
  • Widget Design
    3min
  • Online Offline
    4min
  • Pre-Chat Form
    3min
  • Triggers
    3min
  • Responding To Chats
    2min
  • Shortcuts And Tabs
    5min
  • Three Tips
    2min
  • Team Collaborating
    3min
  • Features
    4min
  • Conclusion
    1min
Menu
  • Introduction
    30s
  • Widget Design
    3min
  • Online Offline
    4min
  • Pre-Chat Form
    3min
  • Triggers
    3min
  • Responding To Chats
    2min
  • Shortcuts And Tabs
    5min
  • Three Tips
    2min
  • Team Collaborating
    3min
  • Features
    4min
  • Conclusion
    1min

You can have multiple aliases, so you can answer each chat with any name you like. To Manage Aliases:

  1. Log-in to Your Dashboard
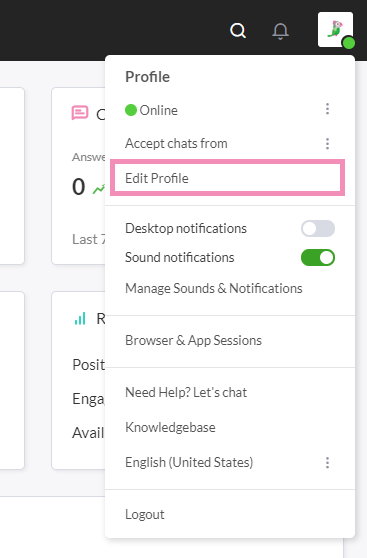
  2. Go to My Profile  (top right-hand corner of the dashboard) and select Edit Profile.

3. Go to Aliases.

You can edit an already existing Alias by clicking on it in the list of existing Aliases or you can create a new Alias by clicking the green “Add Alias” button in the top right corner. To Delete an Alias check the box to the left of the Alias you want to Delete and then press the delete button that will appear.

Adding an Alias Image to the Chat Widget

When you answer a chat using an Alias you can choose to display an image in the widget. To add an image to the chat widget pull down the “Modify Alias Image” Menu to display image settings. Then Upload, Take a Photo, or select an avatar.

NOTE: This image will only appear in the widget when an incoming chat is answered using that Alias.

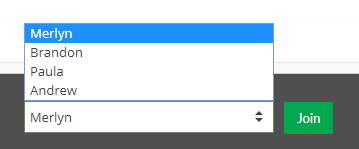
To answer an incoming chat using an Alias just click on the menu to the left of the Join button and Select the Alias you want to use. Then click Join. You can set any Alias to be the Default Alias that will be pre-selected for you.

Get tawk.to

  • Web Browser
  • Windows
  • macOS
  • iOS & Android

Products

  • Live Chat
  • Chat Pages
  • Knowledge Base

Services

  • Hire Chat Agents
  • Hire a Virtual Assistant

Resources

  • Help Center
  • Academy
  • Developers
  • Blog

About

  • The Team
  • Careers - Join us!
  • Customers
  • Partners

Let's tawk?

The green widget you see below this text is the tawk.to live chat widget, if you click it you will see the window maximize and you will be able to chat with the tawk.to team 24×7-365. You can add a chat widget like this on your own site, with your own custom colors, messages, size, position and language. Click the widget and give it a try!

  • Privacy & Terms
  • Report Abuse
  • Contact Us
Linkedin-in
Twitter
Facebook-f
Instagram
Youtube
Wordpress

© Copyright 2020 tawk.to, inc. All Rights Reserved. Various trademarks held by their respective owners.


    - No payment needed, just a completely free 7 day trial!