
NEW OPTION: There is a new option in Wix for placing the HTML box on your site. You are no longer required to add a frozen footer (fixed position footer) to keep the widget in place while the page scrolls.
Create the HTML box and paste the www.tawk.to widget code into the HTML BOX. Then right click on the HTML box and pin it to the screen wherever you like. This is an alternative to adding the fixed position footer in step 4 and is much easier. Simply follow steps 1 through 3 below and then right click on the HTML box and choose PIN TO SCREEN
We will be updating the video below soon to include this new option.
Here is a video walkthrough that will guide you through the process.
Here’s a sample site where you can see what the widget should look like once it’s been installed: http://tawktest.wix.com/tawky-test
The following steps will show you how to add the www.tawk.to widget to a Wix.com site.
Step 1.
First you will need to copy the Widget code from the www.tawk.to dashboard.
Log in to the dashboard: https://dashboard.www.tawk.to
1. Click “Admin” at the top of the www.tawk.to dashboard.
2. Copy the Widget Code you see to the right in the assets column.
Step 2.
Login to your Wix.com account
Click the Blue Edit button to make changes to your site.
Click Add (it’s the plus sign on the menu to the left in WIX editor)
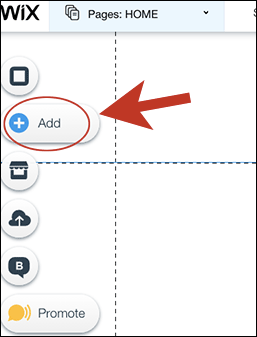
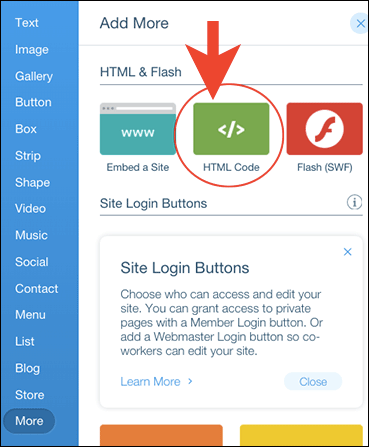
Then click More at the bottom of the list and choose HTML Code.
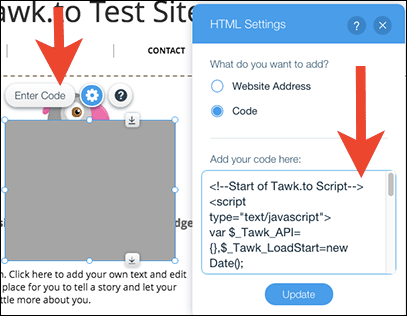
On the HTML settings screen click the ENTER CODE button. A small window will open. This is where you will paste the www.tawk.to widget code you copied from the www.tawk.to dashboard. Then Click UPDATE. Close the HTML settings box.
.
You will now have the HTML box with the www.tawk.to widget code on the page.
Step 3.
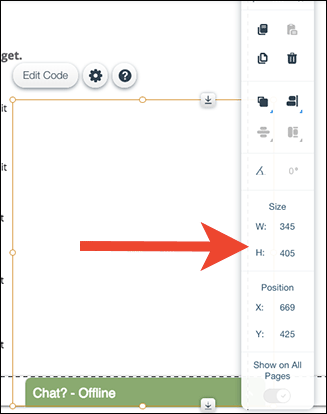
Now we need to Resize This HTML Box. Click on the HTML box once to highlight it. Then to the right in the settings toolbar change the size of the window or expand it manually by dragging it with your mouse.
Set the dimensions to:
Width: 400
Height: 620
Now the box is big enough for the widget to expand when opened.
ATTENTION: You can now SKIP STEP 4 by right clicking on the HTML box and choosing PIN TO SCREEN. Then drag the box to the bottom right corner of your site (or wherever you would like the widget to appear).
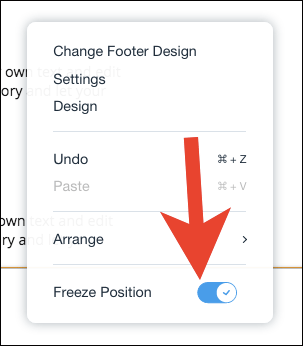
Step 4.
Go to the bottom of your site where the footer is. This is the area that has the copyright notice and usually says “Proudly created with Wix.com”
When you Right Click into the footer area you will see a small menu pop up for the footer. At the bottom of this menu there is an option for “Freeze Position”. You must check this box or the www.tawk.to Widget will only show up at the very bottom of the page. Using the Freeze Position option will solve this problem.
Step 5.
Now Drag the HTML box to the Footer Area of your site. You will see a Move to Footer message appear. Click Move to Footer.

This will expand the Footer to the height of the HTML Box. You can click on the footer and drag it up from the bottom to return it to it’s normal size.

Then make sure that the Top of the Widget lines up with the Top of the Footer area as shown above.
Step 6.
Preview
Click Preview at the top right of the Wix.com dashboard. Check the widget. Make sure when you click on it it’s aligned to your satisfaction and the entire top of the widget is visible. If you like what you see go back to the editor and click Publish! If not you can drag the HTML box to make adjustments. That’s it you’re done!