Today we launched a dedicated Messaging (Beta) section, with a major change in how we manage offline messages and history (now stored in All Messages). We also added the ability to create and accept incoming Tickets, and have created a sub-section called Contacts to track your engagement history with your users.
The Basics
If you have an existing ‘Site’ or ‘Page’ set up, when you click on Messaging you will see a tree like this on the left:
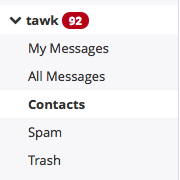
From top down :
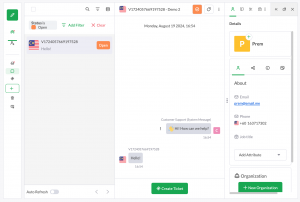
- Your-site-name (# of Unread Messages) – All missed chats, offline messages and incoming tickets will land in the your site inbox, allowing you to read and discard the latest messages.
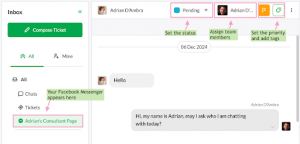
- My Messages – All tickets assigned to you, or a department that you’re a part of will land in the My Messages inbox.
- All Messages – This replaces the old History section, keeping a record of all messages and tickets.
- Contacts – If you use a pre-chat form, or if someone creates a ticket by sending you an email, a Contact will be stored and any further correspondence will create a timeline of your conversation history with that user. This section is currently limited, though will grow to become a very valuable and efficient way to see your entire engagement history with specific users.
- Spam – Our spam filters will catch spam emails and store then in your spam box.
- Trash – Deleted items go to the trash, until you empty it.
Here are some tips to get the most out of Messaging:
- Consider adding a Pre-Chat form to all your chat widgets, and make Name & Email mandatory. This will give you the ability to collect ‘Contacts’ and track their engagement history over time.
- You can now convert Chats in to Tickets, and continue the conversation via email, simply click on a chat and click “Create Ticket”.
- Tag chats and Tickets so that you can easily search for them later by specific tags.
- If you’re offline and a visitor leaves an message or if you miss a chat, you can now easily reply directly from within the dashboard. When you reply to an offline message it gets sent to the users email, where they can instantly pick up where they left off.
Setup Mail Forwarding to get started with Ticketing
Login to the dashboard and click Sites & Pages
- Click Admin at the top of the dashboard.
- Click Mail Notifications at the bottom left of the properties options.
- Setup a forwarder for your custom email (eg: support@yourdomain.com) and point it to the email found in the Ticket Forwarding Email field.
- Send yourself a test email, and confirm it arrives in the correct Inbox within the dashboard.
- You’re done! Now when someone sends an email to support@yourdomain.com it will arrive in the dashboard.
Coming Soon
- The ability to setup a custom outgoing email like support@yourdomain.com, with custom SPF records so that we can send email on your behalf when you create tickets from within the dashboard, currently they go out as <customid>@tickets.www.tawk.to.
- Customizable Auto-Reply messages for incoming tickets.
- Manage the order of sites in the Messages list.
- Much better Fast-Search filtering to find messages and contacts quickly.
- UI updates (we realize it isn’t all that ‘pretty’ right now, our focus has been on functionality).
- The ability to integrate with Facebook, Wechat, Whatsapp and Twitter so you can respond to incoming messages all from within the www.tawk.to dashboard.